Installing and Setting up a VCR or DVD Unit to New LCD TV
Please note that Porter Electronics offers a digital copy of your manual free of charge. Most can easily be downloaded directly from www.porterelectronics.com under your specific model. If you are unable to locate your manual on our website, just email us at info@porterelectronics.com and we are happy to send one to you.
There are a number of different ways a VCR or DVD can be hooked up to your TV. Depending on how you want to use it, along with what type of TV you have, will depend on how you will hook it up. Older TV’s are different from the newer flat screen TV’s that are now available. Below are some instructions that should work for either type of TV.
Please note that newer TV’s require you to change the source or input on your TV to be able to view your VCR or DVD. Example: (video1, video2, hdmi1, hdmi2). This is different from older TV’s that would allow you to view your VCR or DVD on channel 3 or 4.
What if I have everything hooked up to my New TV and I can only hear sound or I can only see the picture?
This is a common issue with hooking up older equipment to newer TV’s. This only means there might be a bit more configuration that needs to be done. If you can hear the sound but not see the picture, you will need to play around with the source/input on your TV. At the least you should be able to see the menu of your device if everything is hooked up correctly.
If you are able to see a picture but no sound, you will need to check the audio settings on your TV. Some smart TV’s have multiple sound settings and come pre-programmed to only play HD sound. You will need to go into your audio settings(exact instructions are different for each TV) and adjust so that the sound can play out through the AV ports.

Connect a VCR with the Yellow, Red and White Leads(RCA Cable)

To connect a VCR to most flat screen TVs, you will need a cable with these yellow, red and white connectors. These plugs are often called RCA or Phono plugs. The yellow cable is used for the video signal, the red cable for the right audio, and the white cable for the left audio signal. Many VCRs come with these leads supplied. If you don’t have any, they should be available at most electronic or electrical stores including Walmart and Target.
The rear of the VCR

his photo shows the standard connectors on most (stereo) VCRs. If you look closely, on the right hand side are the “line out” sockets (the left hand side is for “line in”, which we don’t use for connecting to a TV). The top right red socket is for the right audio out. The white middle right connector is the left audio out socket. The yellow socket at the bottom right is the video out socket.
The markings or labels on most VCRs are hard to read as in this photo. Double check that you are connected correctly to output or input. Once you have found the line out sockets, it is a simple matter of connecting the yellow, red and white plugs of the connecting cable to the corresponding yellow, red and white line out sockets of the VCR.
The Rear of an Older Flat Screen TV

Older flat screen TVs are easy to connect a VCR to as they have at least one yellow “video in” socket. In this photo you can see it just below the center of the photo, it is labelled “Video”. Below this yellow socket for video in is the corresponding white and red sockets for the left and right audio in.
Having found the yellow, red and white sockets, it is a simple matter of connecting the corresponding yellow, white and red plugs of the cable connected to the VCR to these sockets.
You may have noticed that in this photo, these sockets are in a section labeled “VIDEO 1 IN”. This normally would indicate that this is the input you need to select on the TV to watch the VCR. Most TVs require you to press “Source” or “Input” on the remote control to select the “Video 1” input signal.
Other TVs might label these inputs “AV” (short for Audio/Video).
Some older TVs might have several AV inputs, normally labelled AV 1, AV 2 etc. Many older flat screen TVs also have AV inputs on the side of the TV as well as on the rear of the TV.
My TV doesn’t have a Yellow Socket!
I get many questions from people saying they can’t find the yellow socket to connect a VCR into. Don’t worry, I have a solution. But first check the sides of your TV to make sure the ports (connectors) are not on the side of the tv.
Don’t worry if you can’t find a yellow socket to connect a VCR in to, as many new TVs don’t have one. Manufacturers think there is no need to supply TVs with the ability to connect a VCR through the standard yellow, red and white sockets. Instead they get you to connect to the green socket.
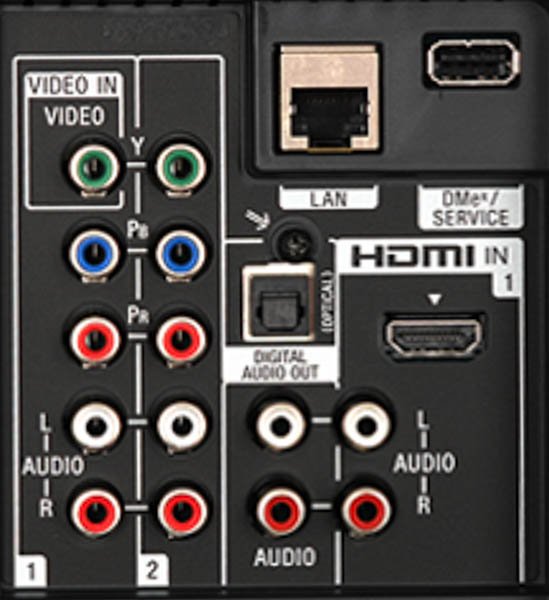
The Rear of a New Flat Screen TV

At the rear of many new flat screen TVs there is no yellow socket for “Video In”. But as you can see in this picture, they say you can use the green socket instead. Notice on this TV, (and most others) there is only one of the green sockets nominated as “Video in” for you to connect a VCR to.
So for this TV, you would connect the yellow lead from the VCR to the nominated green “Video in” socket. The red and white audio leads from the VCR would connect to the corresponding red and white audio sockets below the blue and red.
Be careful not to connect the red audio cable, to the other red socket labelled “Pr” – the right audio will not work if you do this.
Note that not all TVs label the video in as clearly as in this photo. Some simply put a yellow circle around the appropriate green socket. Others label this socket as “Composite Video”.

Composite Vs Component Video
The green, blue and red sockets labelled Y, Pb and Pr in the photo above are for connecting a DVD player. These three video signals are called “Component Video”. It is the best way of connecting a DVD player if the DVD player doesn’t have HDMI. The green input from a DVD player is basically the black and white picture. The blue and red inputs are for the color information of the picture. Then the other red and white sockets are for the right and left audio.
The video signal from a VCR has the black and white picture and the color information all joined together – called composite video.
Modern TVs are clever enough to know when you only have one lead connected with all the information (composite video) or separate leads (component Video). Hence they don’t need to provide a separate input for Composite only. For a more detailed explanation of component video see this article, or this article to learn more about composite video.
My VCR only has a white audio out

Many VCRs are not stereo, they are only mono. That is, they do not output a left and right audio channel. Instead they only output one single audio channel (mono audio). Therefore, they do not have a red and white audio output (for right and left audio). They only have a white output, for the mono audio. You may remember most old TVs only had one speaker, so the VCR only needed one audio channel (mono).
To connect a VCR with only mono audio to a flat screen TV, simply go from the “audio out” socket of the VCR.

Some TVs will have sockets on the back like this picture. On the left hand side you should see the Audio right (red) and left (white) input sockets. The left socket is also labelled “MONO”. If your TV is like this, then simply connect the “mono out” from the VCR to the “mono in” of the TV. The TV should direct the sound to both (left and right) speakers of the TV.
If your TV does not have a Mono input, then you have two options:
1.You can simply connect the “mono out” from the VCR to the “Left in” on the TV. This will send the sound to the left speaker only. While you might think this is not ideal, you may be surprised that it sounds fine when sitting some distance from the TV. The red cable is not used if connecting to the TV this way – it can just hang on its own behind the VCR and TV.

2.You can use a cheap mono to stereo adapter cable. The single (black) plug is connected to the white audio out of the VCR. Then a normal red and white audio lead is connected from the adapter cable to the right (red) and left (white) audio in sockets of the TV. This will send the same mono audio to both the right and speakers of the TV.
3.You can
also use a mono to stereo adapter plug. This plugs straight into the ‘Audio
Out”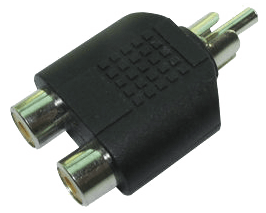 on the
back of the VCR. Then a normal red and white audio lead is connected from the
two sockets of the adapter to the right (red) and left (white) “audio in”
sockets of the TV. This works exactly the same as the lead above – use
whichever one is available to you.
on the
back of the VCR. Then a normal red and white audio lead is connected from the
two sockets of the adapter to the right (red) and left (white) “audio in”
sockets of the TV. This works exactly the same as the lead above – use
whichever one is available to you.
Whichever way you connect the mono audio, you will hear the sound through the TV. Keep in mind that many video recordings were probably recorded in mono, so you are not missing much.
If you have an older TV, or some newer tv’s will allow you to connect using an RF cable. Below is an illustration on how this would work.

Troubleshooting
VCR ate my Tape
Sometimes shipping a VCR can make it a little temperamental when playing older tapes or just after hook up. There is an easy way to get your tape out of the machine without ruining it or the VCR. Just turn your VCR upside down and press the eject button. You will be surprised how the tapes comes out without any trouble.
Try inserting the tape again to see if it will play. Sometimes this happens once or twice and then the problem goes away.
DVD Recorder is not recording well on my DVD’s
We sell all sorts of different DVD recorders. Many people focus on the format of the DVD’s and not on the speed of them. The format is important, however if you are trying to run a 24x speed disc in a player that maxes out at 8x, then you will have trouble. Many of our units max out at 4x speed. Please read manual and verify the correct speed of disc that is needed for your specific machine. Some of the symptoms you will experience are freezing during recording, losing recordings, DVD player locking up, error messages and other similar symptoms.
DVD VCR Combo will only play DVD’s. Will not play VHS
Most of our DVD/VCR combos have 2 different types of output connections. One is strictly for DVD. The other type will play both VHS and DVD. Take a look at the picture displayed below.
The section on the left side with the red, white, and yellow connectors has an in and out. You would use the out to go to your tv. This section will play both VHS and DVD. The connectors on the right include red, green and blue connectors. If hooked up this way, you will only get DVD to play on your screen. If you are wanting to use the blue, green and red component connection for better picture, you will also then need to hook up the red, yellow and white so that the VHS will work.
Recent Posts
-
Difference of Kodak Slide Projectors
Carousel Models4000 - No Features at all4200 - Manual Focus/ No Remote4400 - Manual Focus/ includes …7th Nov 2023 -
How often should I run a head cleaner on my VCR?
Running a head cleaner through your VCR (Video Cassette Recorder) is essential for maintaining opt …26th Sep 2023 -
Best Way to Maintain a VCR
Maintaining a VCR (Video Cassette Recorder) to ensure its optimal performance and longevity involves …25th Sep 2023